If you’re planning a Zion National Park itinerary for 3 days, you’re in the right place. Zion is one of those parks that looks stunning in photos and somehow still manages to exceed expectations in person — but only if you plan ahead. Get the logistics wrong and you’ll spend half your trip stuck in traffic on Highway 9, waiting for a shuttle, or showing up to Angels Landing without a permit. This guide is written to help you skip all of that.
Before You Go: What Every First-Timer Needs to Know
Timed Entry Permits
During peak season, Zion requires timed entry permits to drive into the park on Highway 9. These are separate from trail-specific permits, sell out fast, and are released on a schedule through recreation.gov. Check the NPS website for current release dates and pricing — they change seasonally.
The Shuttle System
Private vehicles are not permitted on Zion Canyon Scenic Drive during peak season. You’ll park at the Visitor Center and ride the free park shuttle to trailheads. Shuttles fill up by mid-morning. To beat the crowds, be on the first or second shuttle of the day — aim to arrive at the Visitor Center by 7:00 a.m. or earlier in summer.
Note for guests staying in Apple Valley: Skip the Google Maps route through Hurricane and La Verkin (45–50 min) — it’s unnecessary. The direct route via Main Street and the Smithsonian Butte byway is a well-maintained dirt road that gets you into Springdale in about 30 minutes. Ask at your property for directions.
Angels Landing Permits
Angels Landing requires a separate permit through a lottery on recreation.gov. This is not a walk-up permit — plan ahead and enter the lottery in advance. Check current NPS lottery schedules and fees before your trip.
What to Wear for The Narrows
The Narrows is a wading hike — you will get wet. Neoprene socks and water shoes or canyoneering boots are strongly recommended. In cooler months, a wetsuit is essential. Rentals are available in Springdale. Never enter The Narrows if there is any flash flood risk — check conditions at the Visitor Center first.
Day 1: Get Oriented — Canyon Overlook, Emerald Pools, and Your First Sunset
Day 1 is about getting your bearings and letting your legs wake up. Save the big hikes for Days 2 and 3.
Morning: Canyon Overlook Trail
- Difficulty: Easy to Moderate
- Distance: 1 mile round trip
- Time: 45–60 minutes
- Trailhead: Just east of the Zion–Mount Carmel Tunnel on Highway 9 — no shuttle needed
One of the best bang-for-your-buck hikes in the park. Short trail, narrow ledges with a cable handrail, and a wide-open canyon view at the end. Hit this early before the parking area fills.
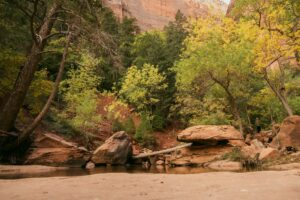
Midday: Emerald Pools
- Difficulty: Easy (Lower), Moderate (Middle/Upper)
- Distance: 1.2 miles round trip (Lower only) to 3 miles (all three pools)
- Time: 1–2.5 hours
Take the shuttle to the Zion Lodge stop. The Lower Emerald Pool features a waterfall and is accessible to most hikers including families. Push up to the Upper Pool if you have energy — it sits in a bowl with sheer walls on three sides and is one of the quieter spots in the main canyon.
Evening: Settle Into Your Basecamp
If you’re staying at Zion’s Tiny Getaway in Apple Valley, the evening drive back takes you through high desert terrain with outstanding sunset light on the red rocks. The quiet here is a genuine asset — better sleep means a better start to Day 2.
Day 2: The Big Hike — Angels Landing or Observation Point
Option A: Angels Landing (Permit Required)
- Difficulty: Strenuous
- Distance: 5.4 miles round trip
- Elevation Gain: ~1,488 feet
- Time: 4–6 hours
The iconic Zion hike. After a series of steep switchbacks called Walter’s Wiggles, the trail narrows to a spine of rock with fixed chains bolted into the face. The exposure is real, the drop-offs are significant, and the summit view is unlike anything else in the park. A permit is required for the upper section — enter the lottery on recreation.gov ahead of your trip. Start on the first shuttle. The chain section gets dangerously congested once crowds arrive.
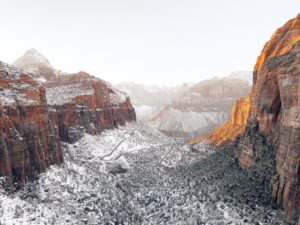
Option B: Observation Point (No Permit, Equally Stunning)
- Difficulty: Strenuous
- Distance: 8 miles round trip
- Elevation Gain: ~2,148 feet
- Time: 5–7 hours
Observation Point sits above Angels Landing and gives you a better overall view of the canyon — you’re looking down at Angels Landing from here. Longer and more elevation, but no chains and no permit required. Note: confirm current trail access via NPS before your trip, as some approach routes have had closures due to rockfall.
Day 3: The Narrows — Zion’s Most Unforgettable Experience
The Narrows: Bottom-Up Route
- Difficulty: Moderate to Strenuous (varies with water levels)
- Distance: Up to 9.4 miles round trip (most day hikers turn around well before)
- Time: 4–8 hours depending on distance
- Trailhead: Temple of Sinawava — last shuttle stop
There is no trail. The Virgin River is the trail. You walk upstream through water ranging from ankle-deep to chest-deep, flanked by sandstone walls rising over a thousand feet overhead. It’s completely unlike any other hike in the Southwest.
The paved Riverside Walk (2 miles round trip) leads into the canyon — worth doing even if you don’t enter the water. Most day hikers push to Wall Street, roughly 1.5 miles upstream from where the pavement ends, where the canyon narrows to as little as 20 feet wide.
Narrows Gear Checklist
- Water shoes or canyoneering boots (not trail runners — they don’t grip wet rock)
- Neoprene socks in spring or cooler months
- Trekking pole or walking stick
- Dry bag for phone and valuables
Book your Springdale gear rental the day before to guarantee availability.
Afternoon: Pa’rus Trail or Departure
If you have a late checkout, the Pa’rus Trail is a flat 3.5-mile paved path along the Virgin River connecting the Visitor Center to Canyon Junction. Open to bikes and pedestrians, no shuttle required — a perfect wind-down on your last afternoon. For more ideas on what to explore in and around the park, visit our adventure guide.
Where to Stay: Why Apple Valley Beats Springdale for This Itinerary
Most first-timers default to Springdale because it’s at the park entrance. It’s convenient — but it comes with tradeoffs: higher prices, more noise, and more competition for parking. There’s a better option.
Zion’s Tiny Getaway is a boutique tiny home resort in Apple Valley, Utah — a short drive from the park via Highway 9. With around 40 individual tiny homes set against the desert landscape, it’s a proper basecamp: comfortable, quiet, and positioned to give you easy park access without the Springdale premium. You wake up in red rock country, have a real bed, and you’re on the road early enough to catch the first shuttle before crowds hit.
Frequently Asked Questions
How many days do you need at Zion National Park?
Three days is enough to cover the main highlights — Angels Landing or Observation Point, The Narrows, and a few shorter trails — without feeling rushed. For backcountry or adding Kolob Canyons, budget four to five days.
Do you need permits for Zion National Park?
Yes — two types. During peak season, a timed entry permit is required to drive into the park on Highway 9. Angels Landing also requires a separate permit via a recreation.gov lottery. Both are subject to change — always check current NPS guidelines before your trip.
Is Zion hard to hike?
It depends on the trail. Canyon Overlook and Lower Emerald Pools are manageable for most people. Angels Landing and Observation Point are genuinely strenuous with significant elevation gain. The Narrows difficulty varies with water levels and how far you go. Don’t underestimate the heat and sun exposure, especially in summer.
What is the best time of year to visit Zion?
Spring (March–May) and fall (September–November) offer the best combination of weather and manageable crowds. Summer is hot and extremely busy but doable if you start hikes early. Winter is uncrowded and beautiful — The Narrows typically requires a full wetsuit in cold months.
Ready to book your Zion basecamp? Check availability at Zion’s Tiny Getaway →